- Best Dokploy Tutorial 2026: Deploy Apps in 10 Minutes.Step-by-Step Guide
- What Is Dokploy? (Simple Explanation)
- Why Use Dokploy in 2026?
- Top Reasons People Choose Dokploy in 2026
- Requirements Before You Start
- Step-by-Step: How to Install Dokploy (Dokploy Setup Guide)
- Deploy Your First App in 5 Minutes
- Key Features of Dokploy
- Dokploy vs Heroku vs Vercel (Quick Comparison)
- How VyomCloud Helps You Run Dokploy Smoothly
- Common Mistakes to Avoid
- Pro Tips for Getting the Most Out of Dokploy
- Conclusion
- Related Reading
- FAQs
Best Dokploy Tutorial 2026: Deploy Apps in 10 Minutes.Step-by-Step Guide
Tired of paying $7–$20 every month just to host a single app? You’re not alone. Many developers, students, and small businesses are struggling with high hosting fees from platforms like Heroku and Vercel. The good news? There’s a free, simple, and powerful alternative called Dokploy.
In this Dokploy tutorial 2026, you’ll learn exactly how to deploy your first app in under 10 minutes — even if you’ve never touched a server before. No complex commands, no hidden fees, and no lock-in. Just a clear, step-by-step guide to get your website or app live on your own server.
What Is Dokploy? (Simple Explanation)
Dokploy is a free, open-source tool that lets you deploy websites and apps on your own server — like a free version of Heroku or Vercel, but with full control.
Think of it this way: instead of paying a cloud company to host your app, you install Dokploy on your own VPS (virtual private server). Then, you connect your GitHub code, click “Deploy,” and your app goes live — all with automatic SSL, databases, and live logs.
You don’t need to be a server expert. Dokploy gives you a clean, visual dashboard where you can:
- Connect your GitHub repository and deploy with one click
- Set up databases like MySQL, PostgreSQL, or MongoDB in seconds
- Get free SSL certificates for HTTPS automatically
- Watch your app run in real-time with live logs
Why Use Dokploy in 2026?
Hosting costs are rising. Heroku charges $7/month per app. Vercel and Netlify offer free tiers, but they limit your resources, bandwidth, or features. With Dokploy, you pay only for your server (as low as $5/month) and run unlimited apps.
Top Reasons People Choose Dokploy in 2026
- 100% Free – No hidden fees, no premium plans for basic features
- Easy to Use – Simple dashboard, no command-line needed after setup
- Works with GitHub – Push code, and Dokploy deploys it automatically
- One-Click Databases – Need MySQL, PostgreSQL, or Redis? Click and done
- Free SSL – Your sites get HTTPS automatically
- Full Control – Your data stays on your server, not someone else’s cloud.
Requirements Before You Start
Before installing Dokploy, make sure you have:
- A VPS server (from VyomCloud Hostinger, DigitalOcean)
- At least 2GB RAM (4GB recommended for smooth performance)
- Ubuntu 20.04 or newer is installed on your server
- Basic access to your server via SSH
Pro Tip: If you’re in India and want affordable, fast VPS servers optimized for Dokploy, VyomCloud offers plans starting at just ₹399/month with excellent uptime and support.
Step-by-Step: How to Install Dokploy (Dokploy Setup Guide)
Don’t worry — this is easier than it sounds. You’ll be up and running in under 10 minutes.
Step 1: Get a VPS Server
Sign up for a cheap VPS. Good options include:
- VyomCloud – ₹399/month (best for India, optimized for Dokploy)
- Hetzner – €5/month (great value for Europe)
- Hostinger – $6/month
- DigitalOcean – $6/month
Once you have your server IP and root password, connect via SSH:
bash
ssh root@your-server-ip
Step 2: Run One Command
Copy and paste this single line into your terminal:
bash
curl -fsSL https://get.dokploy.com | bash
That’s it. Wait 3–5 minutes while Dokploy installs Docker, sets up containers, and configures the dashboard. You’ll see a message like “Dokploy installed successfully” when it’s done.
Step 3: Open Your Dashboard
Open your browser and go to:
text
http://your-server-ip:3000
You’ll see a signup page. Create your admin account:
- Pick a username (like admin)
- Set a strong password
- Click “Save”
Welcome! You’re now in your new deployment dashboard.
Deploy Your First App in 5 Minutes
Let’s deploy a simple Node.js app from GitHub.
Step 1: Create a New Project
In Dokploy:
- Click “New Project”
- Name it (e.g., My First App)
- Choose GitHub as your source
Step 2: Connect Your Repository
- Pick your GitHub repo from the list
- Select the branch (usually main)
- Dokploy will auto-detect your build settings
Step 3: Click Deploy
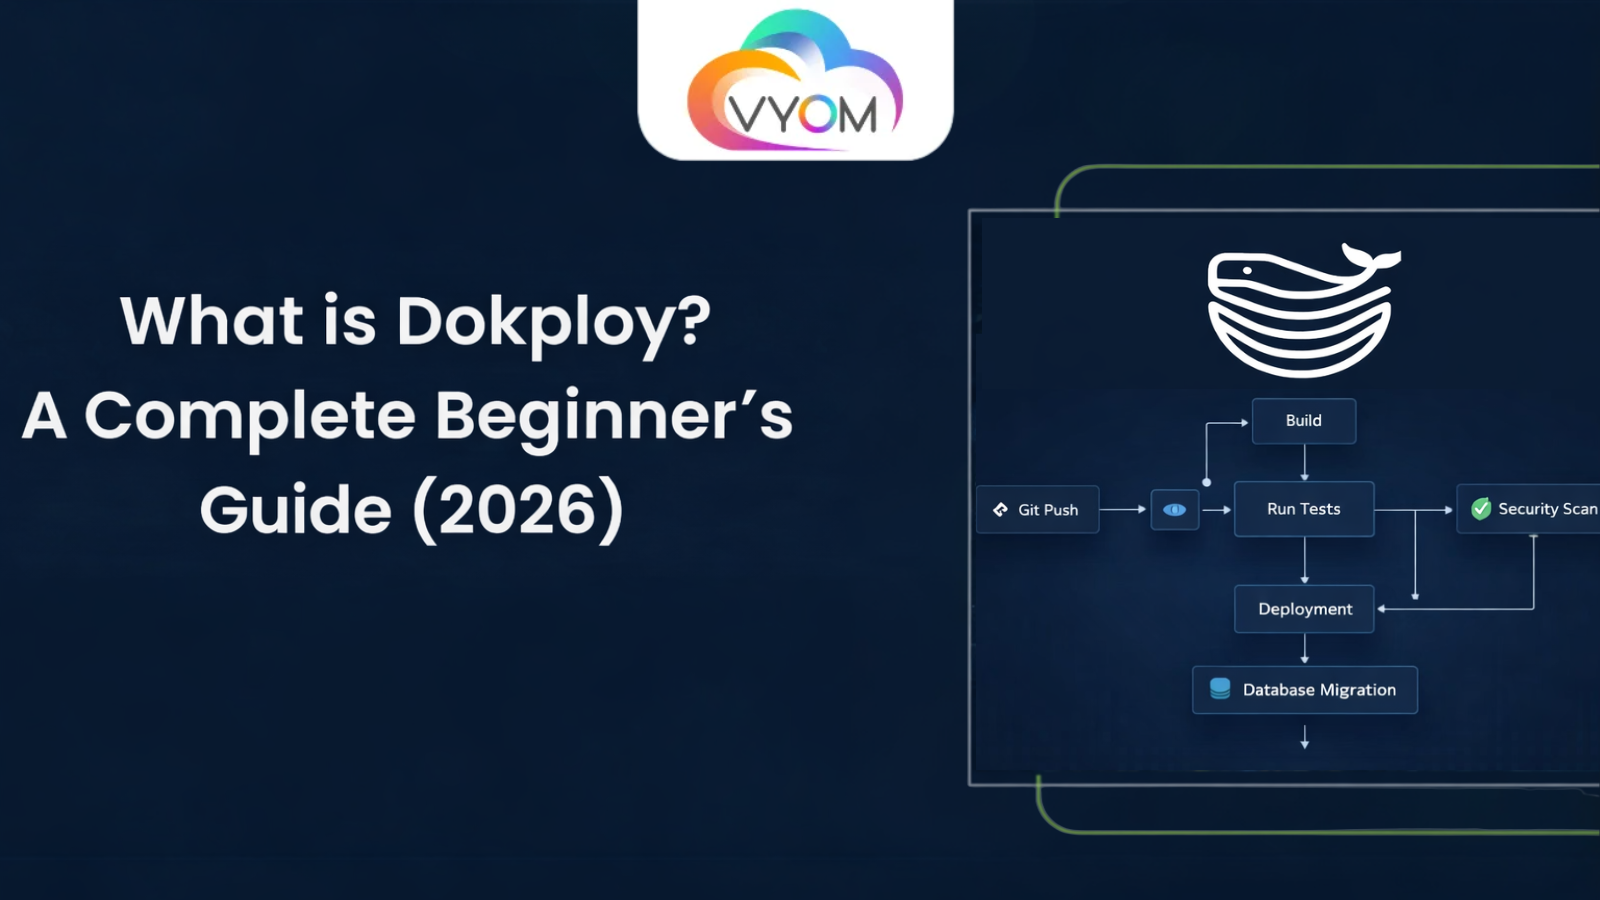
Hit the “Deploy” button. Watch the live logs as Dokploy:
- Clones your code
- Builds your app
- Starts your container
In 2–5 minutes, your app is live! You’ll get a URL like your-app.dokploy.com.
Step 4: Add Your Custom Domain (Optional)
Want your own domain?
- Go to Domains → Add Domain
- Enter your domain (e.g., myapp.com)
- Point your DNS A record to your server IP
- Dokploy auto-installs free SSL
Done! Your app now runs on https://myapp.com.
Key Features of Dokploy
Here’s what makes Dokploy stand out in 2026:
- Free self-hosted version – with unlimited apps and databases
- One-click GitHub integration – for automatic deployments
- Built-in databases – MySQL, PostgreSQL, MongoDB, Redis
- Automatic SSL – via Traefik (no manual certificate setup)
- Live logs – to monitor your app in real time
- Supports Docker – deploy anything that runs in a container
- Custom domains – with instant HTTPS
- No vendor lock-in – your data stays on your server
You can deploy almost anything:
- Node.js apps (Express, Next.js, NestJS)
- Python apps (Django, Flask, FastAPI)
- PHP apps (Laravel, WordPress)
- Static sites (React, Vue, plain HTML)
- Full stacks (frontend + backend + database)
Dokploy vs Heroku vs Vercel (Quick Comparison)
| Feature | Dokploy | Heroku | Vercel |
| Cost | Free (just server cost) | $7+/month per app | Free tier, then pricey |
| Setup Time | 10 minutes | 5 minutes | 5 minutes |
| Databases | One-click included | Paid add-ons | Limited |
| Custom Domains | Free | Paid on free tier | Free |
| SSL Certificates | Free auto | Free | Free |
| Unlimited Apps | ✅ Yes | ❌ No | ❌ Limited on free tier |
| Best For | Full control + low cost | Quick testing | Frontend apps |
How VyomCloud Helps You Run Dokploy Smoothly
Running Dokploy requires a reliable VPS with good uptime, fast SSD storage, and low latency — especially if your audience is in India.
VyomCloud offers cloud servers specifically optimized for tools like Dokploy:
- Plans starting at ₹399/month
- 2GB–16GB RAM options
- NVMe SSD storage
- 99.9% uptime guarantee
- 24/7 support in Indian time zones
- Pre-configured network for Docker and HTTPS
If you’re setting up Dokploy for the first time, VyomCloud is a great choice to ensure smooth, fast, and cost-effective hosting without the headaches of unreliable providers.
Common Mistakes to Avoid
- Choosing a server with less than 2GB RAM – Dokploy needs at least 2GB; 4GB is ideal
- Not setting up a strong admin password – Use a password manager
- Ignoring DNS propagation – Custom domains can take 1–24 hours to work
- Forgetting to enable UFW firewall – Secure your server with ufw allow 3000
- Skipping backups – Always back up your Docker volumes regularly
- Trying to run Dokploy on shared hosting – You need a full VPS with root access
Pro Tips for Getting the Most Out of Dokploy
- Use GitHub Actions to auto-deploy on every push
- Set up monitoring alerts for your apps
- Enable automatic updates for Dokploy (via the dashboard)
- Use environment variables for secrets (never hard-code API keys)
- Run backup scripts weekly for your databases
- Combine Dokploy with Cloudflare for extra speed and security
Conclusion
If you’re looking for a Dokploy tutorial 2026 that’s simple, clear, and beginner-friendly, you’ve just found it. In less than 10 minutes, you can go from zero to a fully deployed app on your own server — with free SSL, unlimited apps, and zero monthly hosting fees beyond your VPS cost.
Unlike Dokploy vs Heroku debates that favor expensive platforms, Dokploy gives you the power of big cloud services without the lock-in or surprise bills. Whether you’re a student, freelancer, startup, or small business, Dokploy is your ticket to affordable, full-control hosting in 2026.
Ready to start?
- Get a VPS (try VyomCloud for India-friendly pricing)
- Run the one-line Dokploy install command
- Connect your GitHub and deploy your first app
In under an hour, you’ll have your own free deployment platform running — and you’ll never have to pay $7 per app again.
Related Reading
What is a Webhook? Complete Guide with Examples, API & Real Use Cases (2026)
What Is an API? Types, Examples & How It Works (2026)
Let’s Get Social:
Facebook: https://www.facebook.com/vyomcloudnetwork/
LinkedIn: https://www.linkedin.com/company/vyomcloud/
Instagram: https://www.instagram.com/vyomcloud/
FAQs
1. What is Dokploy?
Dokploy is a free, open-source tool that lets you deploy websites and apps on your own server with a simple dashboard, like a free version of Heroku.
2. How do I deploy apps with Dokploy?
Connect your GitHub repo, select your branch, click “Deploy,” and Dokploy will build and launch your app automatically with free SSL.
3. Is Dokploy really free?
Yes, the self-hosted version is 100% free with unlimited apps and databases. You only pay for your VPS server.
4. Can I use Dokploy on shared hosting?
No, Dokploy requires a VPS with root access and Docker. Shared hosting doesn’t support this.
5. What’s the difference between Dokploy and Heroku?
Heroku charges per app ($7+), while Dokploy is free and lets you run unlimited apps on your own server.
6. Do I need coding skills to use Dokploy?
No. Dokploy is designed for beginners. You just connect GitHub, click deploy, and your app goes live.